

Object Detection with YOLOv5 and PyTorch
Object detection is usually one of the most interesting computer vision tasks that a beginner or an enthusiast can use to jump-start their career in computer vision and artificial Intelligence.
In this article, we will learn some basics about object detection before proceeding to detect objects using YOLOv5 and the COCO dataset.
Table of contents
- Table of contents
- Prerequisites
- Introduction
- Setting up the development environment
- Installing project dependencies
- Model inference using detect.py
- Model inference with PyTorch Hub and YOLOv5
- Model training
- Model validation
- Conclusion
- Further reading
Prerequisites
As a prerequisite, you must have:
- Python installed on your machine.
- Basic knowledge of Python.
Introduction
Object detection is a computer vision task that involves identifying instances of an object of a certain class within an image or a video.
Object detection is used in a very wide range of applications like self-driving cars, security, manufacturing, etc.
Object detection has two main state-of-art methods namely:
- One-stage methods - these are mainly focused on the inference speed. Examples include: YOLO, RetinaNet, and SSD.
- Two-stage methods - these are mainly focused on detection accuracy. Examples include: Mask R-CNN, Faster R-CNN, and Cascade R-CNN.
To check our model's accuracy, we will be using the popular object detector metric Average Precision.
In this tutorial, we will be using YOLO (You Only Look Once) specifically YOLOv5 which focuses on inference speed and accuracy.
YOLO is a fast and accurate approach to object detection. The algorithm only looks at an image once and detects all the objects that are present along with their location.
YOLO works by splitting images into a grid where each grid cell identifies an object by itself. The grid cells predict all the bounding boxes and give each of them a confidence score to determine the accuracy of each prediction.
When it comes to performance, YOLO outperforms other object detectors by far. In real-time, it can process images at a rate of around 155 frames per second (fps), achieving double the mAP(Mean Average Precision - a popular evaluation metric for object detectors) of other object detectors like R-CNN.
YOLOv5, the latest release of the YOLO family is a group of compound-scaled object detection models trained on the COCO dataset used for model ensembling (combining multiple models in the prediction process), Test Time Augmentation (performing random modifications to the test images like flipping, rotating, etc.) and hyperparameter evolution (optimizing hyperparameters using a genetic algorithm for optimization).
Setting up the development environment
To set up our development environment, we will start by creating our project's virtual environment as shown below:
Go to the terminal and create a new directory named object-detection as shown below:
mkdir object_detection
Then, create a virtual environment inside your projects directory:
cd object detection
py -m venv .env
We will then activate the environment using the following commands:
cd .env/Scripts
activate
cd ..
cd ..
Once our environment setup is done, we will then move on to install our project's dependencies.
Installing project dependencies
We will start by first cloning the YOLOV5 repository on GitHub using the following command:
git clone https://github.com/ultralytics/yolov5.git
After successfully cloning the repository to our project's environment, we will install all the dependencies using the following command:
cd yolov5
pip install -r requirements.txt
The command above installs the following packages:

Once we're done with installing all the required dependencies, we will move on to training our model.
Model inference using detect.py
Since YOLOv5 is a pre-trained model, we will test its performance by running the following command to see how accurately it detects objects through the web camera.
python detect.py --source 0
Here, --source 0 signifies that the data location is from the live web camera.

To test its performance on other sources like an image file (let's say img.jpg), use the following command:
python detect.py --source img.jpg # for a specific image file
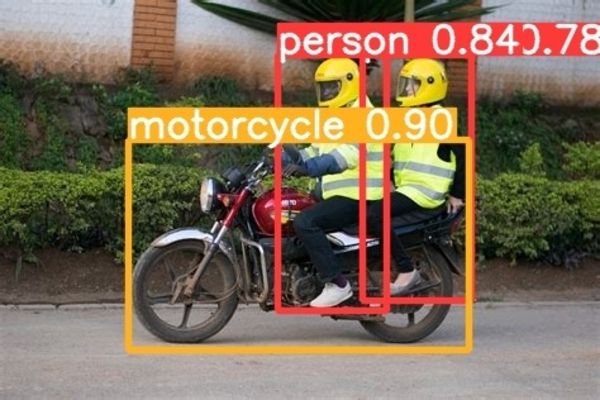
Running the following command will detect objects on our images stored in the path data/images:
python detect.py --weights yolov5s.pt --img 640 --conf 0.25 --source data/images
Here, we are using yolov5 pre-trained weights to train images at a default resolution of --img 640 (size 640 pixels) from source data/images.

The image objects above will be detected as shown below:

The results of the detected image will be stored in the path runs/detect/exp.
For other visual objects, use the following commands:
python detect.py --source vid.mp4  # for a specific video
python detect.py --source path/  # for a specific directory
python detect.py --source path/*.jpg  # for a specific glob
python detect.py --source 'https://youtu.be/Zgi9g1ksQHc'  # for a specific YouTube video
python detect.py --source 'rtsp://example.com/media.mp4'  # for a specific RTSP, RTMP, or HTTP stream
NOTE: Before running the commands above, make sure the objects that you want to detect are located under the
data/...folder. For example,data/videos,data/images, etc.
Model inference with PyTorch Hub and YOLOv5
To check the inference using PyTorch, we will load the pre-trained YOLOv5s model from PyTorch Hub and then pass an image for inference.
NOTE: 'YOLOv5s' is the fastest and lightest YOLOv5 model.
import torch

# Model - we will use yolov5s
model = torch.hub.load('ultralytics/yolov5', 'yolov5s')

# Image
img = 'https://ultralytics.com/images/zidane.jpg'

# Inference
results = model(img) # pass the image through our model

results.pandas().xyxy[0] # return the predictions as a pandas dataframe
The result of the code above will be something like this:

You can also access the results of the code above on GitHub.
Model training
We will proceed to train our model on COCO128 that is downloaded along with YOLOv5 from YOLOv5's latest releases.
We will use YOLOv5 pre-trained weights (--weights yolov5s.pt) when training our custom model as shown below:
python train.py --img 640 --batch 16 --epochs 3 --data coco128.yaml --weights yolov5s.pt --cache
Or use randomly initialized weights (--weights '' --cfg yolov5s.yaml) as shown below:
python train.py --img 640 --batch 16 --epochs 3 --data coco128.yaml --weights '' --cfg yolov5s.yaml --cache
Here, we fine-tuned COCO128 for 3 epochs using pre-trained YOLOv5s.
Our training results will be saved under the directory runs/train/exp with incrementing run directories, i.e. runs/train/exp1, runs/train/exp2, and so on.
Model validation
To evaluate our model's accuracy on the COCO dataset, we will download the COCO 2017 validation dataset using the following command:
torch.hub.download_url_to_file('https://ultralytics.com/assets/coco2017val.zip', 'tmp.zip')
Unzip the file using:
unzip -q tmp.zip -d ../datasets && rm tmp.zip
Once done, we will run the following command to validate our model.
python val.py --weights yolov5x.pt --data coco.yaml --img 640 --iou 0.65 --half
Here, we test the YOLOv5x on COCO val2017 dataset at image size 640 pixels.
Below is an example of our output:

The model's evaluation results will be saved to directory runs/val/exp.
Conclusion
To wrap up, we have learned what object detection is, its applications, and its implementation.
We have also tackled the YOLO object detection algorithm (YOLOv5 particularly) which we used to perform our own object detection by setting up the environment to detect images and videos.
NOTE: The actual process of building the model from scratch goes beyond this tutorial.
Code for the object detector can be found here.
Happy coding!
Further reading
Peer Review Contributions by: Srishilesh P S


Cloudzilla is FREE for React and Node.js projects


