

How to Build a Messaging API Using Twilio's API and Express

Twilio has several APIs that allow you to send and receive a high volume of SMS messages anywhere in the world. Once you register a Twilio phone number, you can use the APIs to manage outbound and inbound messages.
In this article, you will learn how to send SMS messages using the Twilio API with Node.js and Express and save the sent messages in a MongoDB database.
We'll build an API to create contacts for users, send SMS to user-saved contact more like an example phonebook and save sent messages using the Express framework in Nodejs.
If you want to send and receive messages with Facebook Messenger, Viber, or WhatsApp, you can do that as well with Twilo’s Message API but our focus in this article is on sending SMS messages using the third-party Twilio message API.
You can extend the application we're building here to reply to incoming SMS messages or include more complex, interactive elements and give you a head start building autoresponders for your SMS needs, depending on your needs.
Briefly about Twilio and its Message API
Twilio is a customer engagement platform used by a whole lot of businesses and millions of developers worldwide to build unique and personalized experiences for their customers.
Twilio's Programmable SMS API helps you add robust messaging capabilities to your applications. Using this REST API, you can send and receive SMS messages, track the delivery of sent messages, schedule SMS messages to send at a later time, and retrieve and modify message history.
Prerequisites
To follow along, you need:
- Node.js
- Npm or Yarn
- Code Editor (E.g. VsCode)
- Twilio account
- Knowledge of Express.js
Getting started
If you don’t have Node.js installed, head on to the official Node.js website to download Node.js on your PC. Once you install Node.js, you will automatically have npm installed and then you can head over to Twilio to create an account.
Set up a Node server that provides the API for sending a message and the API structure
First, we need to initialise your project using npm; we do so by typing the following in your terminal:
npm init
You'll have to answer some questions related to the project then a package.json file will be created for you.
Next, we need to install the required dependencies. Type the following command in your terminal to install the following packages:
npm install express bcrypt jsonwebtoken mongoose twilio dotenv
You can also install other dependencies using the command structure below:
npm install [package name]
API struture

In the image above, we take a look at how well our API is structured.
In the source folder, we have controllers (this is where the functionality of every endpoint is defined/available for usage for the API), middleware (contains a function(s) that has access to the request object and verifies the token of a user), models (where the database structures are defined), routes (where endpoints are defined for usage be it POST, GET, etc) and utils (utility functions that can be used are here).
Outside the src (source) folder, we have our index.js (where the database connection is done and our server is being run) and app.js (where our app is configured and available routes are specified) file. We also have the .env file that contains environment variables and our .gitignore file.

A .env.sample file
The API requires the above values to work. The Twilio values are provided in your Twilio account.

Index.js file
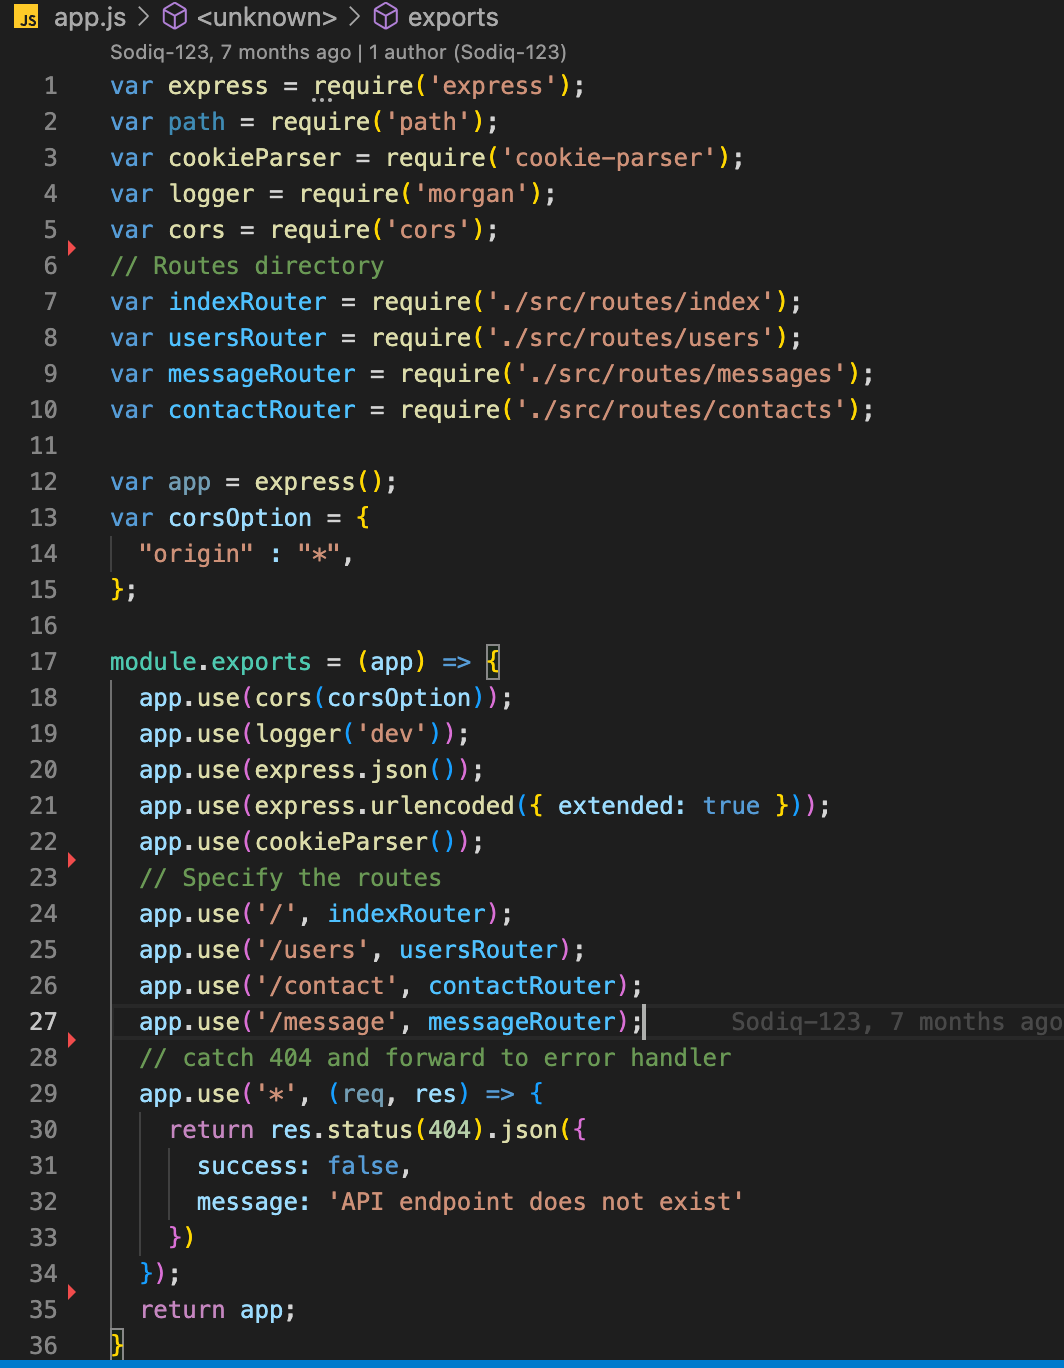
App.js file
Exploring the features/functionality of our API
Firstly, we’ll talk about the structure of the database structure of our API and what it looks like.
We connect to our MongoDB database in the Index.js file from the image above using mongoose ORM as seen below:
1. Users model

This model takes only user details which consist of name, email, password and date (when the user created an account/signed up) as we can see in the image.
2. Messages model
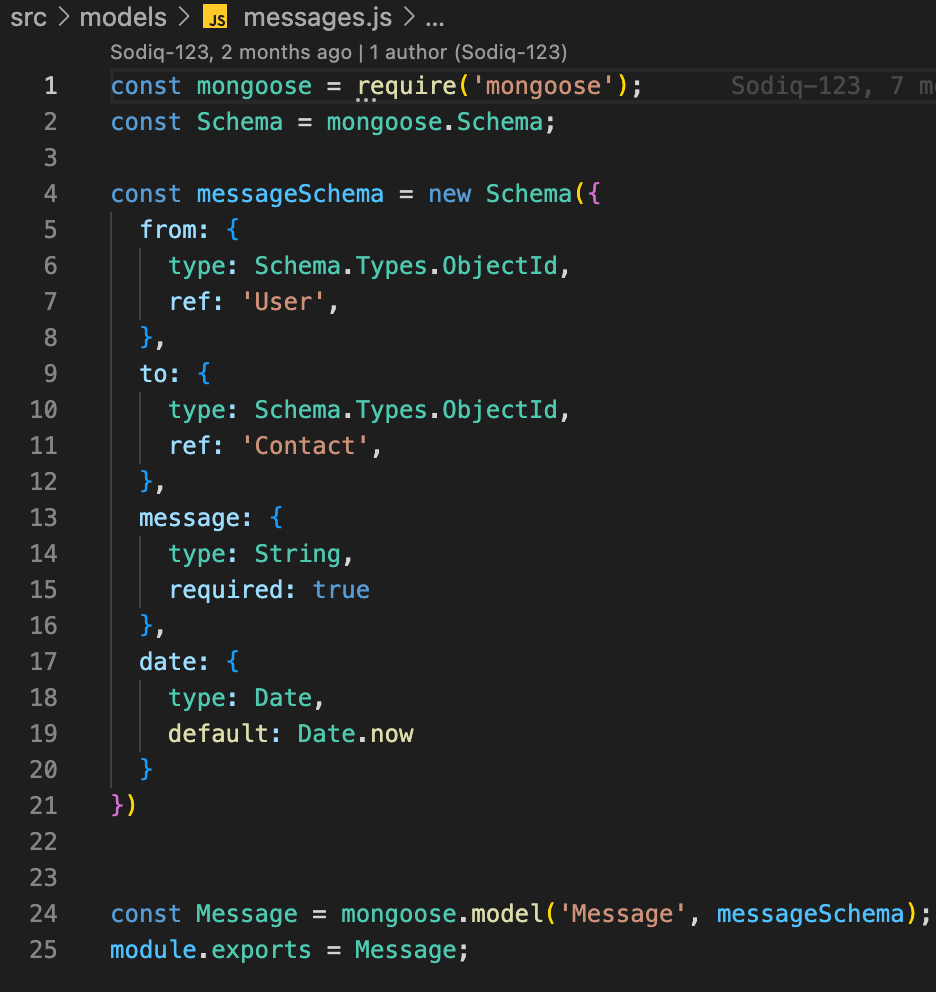
From what we can see above, it has: from (a reference to the sender of a message), to (the receiver of the message), message (the content of the message sent) and date (when the date was sent).
3. Contacts model

In the contacts model, we have the name of a contact, phone number, UserId (the Id of the owner of a contact as referenced in our model in the image above) and the date (when the message was sent).
Now, let’s talk about the routes we have in our API. We basically have three main endpoints. We have the user route, the message route and the contact routes.
- The user route contains
- The authentication routes (sign-up, sign-in/login) for signing up and signing/logging in a user.
- delete-account route for a user to delete their account.
- get-sent-messages route for a user to get all the messages that have been sent by the user.

users.js route file
- The message route file has only one endpoint which is the route to send a message(s) to a saved contact.

messages.js route file
- The contact route file contains five endpoints for you to:
- Create contacts for a user
- Get a contact by name
- Delete a contact by name
- Get all contacts for a user
- Update a contact

contacts.js route file
As we can see in all the route images, there is a verifyToken in the route parameter. It is called middleware as we discussed above. Our authentication middleware is passed to an authenticated route (a route that requires a user to log in) to verify if the token used to log in is valid.
We can see the implementation in the image below:

auth.js middleware file
Lastly, we’ll talk about our controllers which we talked about above.
- The user controller: We have four endpoints for the users, so we, therefore, have four controllers where each endpoint functionality is written.
In this controller, we have four functions which are ‘createUser’, ‘loginUser’, ‘deleteUserAccount’ and ‘getMessages’.
- createUser: This function creates/signs a user up by passing the user’s name, password and email in the body of the request sent to the endpoint. The values passed in the body of the request are validated to be strings before a user can be successfully created. The password of the user is hashed using ‘bcrypt’ before saving it to the database.
- loginUser: This logs an available user in. It gives it a unique signed token using the package ‘jsonwebtoken’ when the user is logged in. This gives the user the leverage to access other routes that require a logged-in user (authenticated routes).
- deleteUserAccount: This allows or gives the user the leverage to delete their account.
- getMessages: Allows a user to get all their sent messages.
The user controller looks like this:
const makeValidation = require('@withvoid/make-validation')
const jwt = require('jsonwebtoken')
const bcrypt = require('bcrypt')
const User = require('../models/users')
const { getUserById } = require('../utils/helpers')
const Message = require('../models/messages')
exports.createUser = async (req, res) => {
  try {
    let { name, email, password } = req.body
    const validate = makeValidation(types => ({
      payload: req.body,
      checks: {
        name: { type: types.string },
        email: { type: types.string },
        password: { type: types.string },
      }
    }))
    if (!validate.success) {
      return res.status(400).json({
        success: false,
        message: validate.errors
      })
    }
    const existingUser = await User.findOne({ email: email })
    if (existingUser) {
      return res.status(400).json({
        success: false,
        message: 'User already exists'
      })
    }
    password = await bcrypt.hash(password, 10)
    const user = await User.create({ name, email, password })
    if (!user) {
      return res.status(400).json({
        success: false,
        message: 'User not created'
      })
    }
    return res.status(201).json({
      success: true,
      message: 'User created',
      data: user
    })
  } catch (error) {
    return res.status(400).json({
      success: false,
      message: error.message
    })
  }
}

// login a user
exports.loginUser = async (req, res) => {
  try {
    let { email, password } = req.body
    const validate = makeValidation(types => ({
      payload: req.body,
      checks: {
        email: { type: types.string },
        password: { type: types.string }
      }
    }))
    if (!validate.success) {
      return res.status(400).json({
        success: false,
        message: validate.errors
      })
    }
    const user = await User.findOne({ email })
    if (user && await bcrypt.compare(password, user.password)) {
      const token = jwt.sign(user._id.toString(), process.env.SECRET_KEY) // create a token
      delete user.password
      return res.status(200).json({
        success: true,
        message: 'logged In successfully',
        data: { ...user.toJSON(), token }
      })
    }
  } catch (error) {
    return res.status(400).json({
      success: false,
      message: error.message
    })
  }
}
// delete a user
exports.deleteUserAccount = async (req, res) => {
  try {
    const user = await User.findOne({ _id: req.user._id })
    if (!user) {
      return res.status(400).json({
        success: false,
        message: 'User not found'
      })
    }
    const deletedUser = await User.findOneAndDelete(req.user._id)
    if (!deletedUser) {
      return res.status(400).json({
        success: false,
        message: 'User not deleted'
      })
    }
    return res.status(200).json({
      success: true,
      message: 'User deleted',
      data: deletedUser
    })
  } catch (error) {
    return res.status(400).json({
      success: false,
      message: error.message
    })
  }
}

exports.getMessages = async (req, res) => {
  try {
    const user = await getUserById(req.user)
    if (!user) {
      return res.status(400).json({
        success: false,
        message: 'User not found'
      })
    }
    const messages = await Message.find({})
    if (messages) {
      return res.status(200).json({
        success: true,
        message: 'Messages fetched',
        data: messages
      })
    }
  } catch (error) {
    return res.status(400).json({
      success: false,
      message: 'Could not get messages'
    })
  }
}
- The messages controller: There is only one function in this controller as there is only one endpoint for messages. The function is what’s responsible for sending messages to a saved contact(s) using the Twilio API and then it saves the messages for the user as sent messages in the Messages model.
Here’s how the messages controller looks like:
require('dotenv').config()
const accountSid = process.env.TWILIO_ACCOUNT_SID;
const authToken = process.env.TWILIO_AUTH_TOKEN;
const client = require('twilio')(accountSid, authToken);
const makeValidation = require('@withvoid/make-validation')
const Contact = require('../models/contacts')
const Message = require('../models/messages')

// Send message to a saved contact
exports.sendMessageToContact = async (req, res) => {
  try {
    let { message } = req.body
    const { name } = req.params
    let from = req.user._id
    const validate = makeValidation(types => ({
      payload: req.body,
      checks: {
        message: { type: types.string },
      }
    }))
    if (!validate.success) {
      return res.status(400).json({
        success: false,
        message: validate.errors
      })
    }

    // send message to contacts number
    let contact = await Contact.findOne({ name })
    if (!contact) {
      return res.status(400).json({
        success: false,
        message: 'contact not found, save contact first!'
      })
    }
    let sendMessage = await client.messages.create(
      {
        body: message,
        from: process.env.TWILIO_PHONE_NUMBER,
        to: contact.phoneNumber
      })
    if (sendMessage) {
      const message = await Message.create({ from, to: contact._id, message: sendMessage.body })
      if (!message) {
        return res.status(400).json({
          success: false,
          message: 'message not saved'
        })
      }
    }
    return res.status(200).json({
      success: true,
      message: 'message sent successfully',
      data: sendMessage
    })
  } catch (error) {
    return res.status(400).json({
      success: false,
      message: error.message
    })
  }
}
- The contacts controller: This contacts controller contains five functions for each of the respective five endpoints available for contacts.
The functions available for contacts controllers are:
‘createContact’, ‘getContactByName’, ‘deleteContact’, ‘getContacts’, ‘updateContact’.
- createContact: This function creates a contact for a user by passing the name and phone number of the contact in the body of the request sent to the endpoint. Note that it’s an authenticated route and there requires the user to be logged in to be able to access the endpoint.
- getContactByName: This function allows a user to search for their contacts by name by passing the contacts name as parameter sent to the endpoint.
- deleteContact: A function that deletes a user's contact by also passing the contact's name in the parameter sent to the endpoint.
- getContacts: This function is to get all contacts of a user.
- updateContact: A function to update a user’s contact.
The contacts controller is shown below:
const makeValidation = require('@withvoid/make-validation')
const Contact = require('../models/contacts')
exports.createContact = async (req, res) => {
  try {
    let { name, phoneNumber } = req.body
    const userId = req.user._id
    const validate = makeValidation(types => ({
      payload: req.body,
      checks: {
        name: { type: types.string },
        phoneNumber: { type: types.string },
      }
    }))
    if (!validate.success) {
      return res.status(400).json({
        success: false,
        message: validate.errors
      })
    }
    const contact = await Contact.findOne({ name: name })
    if (contact) {
      return res.status(400).json({
        success: false,
        message: 'Contact already exists'
      })
    }
    const newContact = await Contact.create({ userId, name, phoneNumber })
    if (newContact) {
      return res.status(201).json({
        success: true,
        message: 'Contact created successfully',
        data: newContact
      })
    }
  } catch (error) {
    return res.status(400).json({
      status: false,
      message: error.message
    })
  }
}

// get a single contact
exports.getContactByName = async (req, res) => {
  try {
    const contact = await Contact.findOne({ name: req.params.name })
    if (contact) {
      return res.status(200).json({
        success: true,
        message: 'Contact found',
        data: contact
      })
    }
  } catch (error) {
    return res.status(404).json({
      status: 'error',
      message: error.message
    })
  }
}

exports.deleteContact = async (req, res) => {

  try {
    const contact = await Contact.findOne({name: req.params.name})
    if (!contact) {
      return res.status(404).json({
        success: false,
        message: 'Contact not found'
      })
    }
    const deleteContact = await Contact.findOneAndDelete({name: req.params.name})
    if (deleteContact) {
      return res.status(200).json({
        success: true,
        message: 'Contact deleted successfully',
        data: deleteContact
      })
    }
  } catch (error) {
    return res.status(400).json({
      success: false,
      message: error.message
    })
  }
}

exports.getContacts = async (req, res) => {
  try {
    const contacts = await Contact.find({})
    if (contacts) {
      return res.status(200).json({
        success: true,
        message: 'Contacts found',
        data: contacts
      })
    }
  } catch (error) {
    return res.status(404).json({
      status: 'error',
      message: error.message
    })
  }
}

exports.updateContact = async (req, res) => {
  try {
    const { name, phoneNumber } = req.body
    const contact = await Contact.findOneAndUpdate({name: req.params.name}, req.body)
    if (contact) {
      return res.status(200).json({
        success: true,
        message: 'Contact updated successfully',
        data: contact
      })
    }
  } catch (error) {
    return res.status(404).json({
      status: 'error',
      message: error.message
    })
  }
}
Conclusion
In this article, we've built a web API on top of the Twilio SMS API that allows users to sign up and create an account, save contacts and send messages.
The messages sent by a user are also saved. We have also learned how to implement third party APIs and how to use MongoDB in an Node.js project.
Note that you can only send messages to registered numbers in your Twilio account.
You can check out the source code of this article here. The published documentation is also available here if you want to see the process of testing the API. You can reach me on Twitter if you have any questions.
Peer Review Contributions by: Wanja Mike


Cloudzilla is FREE for React and Node.js projects


